How to Draw a Pig - 10 Steps & Some Tips & Techniques
Source: https://design.tutsplus.com/tutorials/how-to-depict-a-pig–cms-30794
If y'all're struggling to depict a squealer, that'due south no surprise – they are very challenging animals to draw. Their trunk shapes don't seem the most intuitive sometimes, and they have catchy ears and faces. Their legs are awkward likewise – all in all, information technology'south not like shooting fish in a barrel to draw a pig.
Fortunately, y'all tin can learn some great techniques that volition brand it easier – so let's take a await at pig drawing piece of cake tricks and tips.
Materials
In order to draw a sus scrofa, you'll crave:
- A sharp pencil
- A good blackness fineliner
- Plainly white paper
- A flat surface to lean on
- A ruler
- An eraser
Step 1: Draw The Body As A Rough Oval
To beginning off your piffling sus scrofa, you want to draw its torso. Aim for a rough oval around the center of your page. The oval doesn't need to be bully, and if you lot can make it slightly wider at the front end, this will give your pig more than perspective in the afterwards steps. The wider part will be the front of the pig's torso.
Step ii: Add The Shoulders And Hips
Next, draw a long, thin oval overlapping with about one-fifth of the front of the sus scrofa's torso. This should exist a bit taller than your first oval, merely just a little. This is going to help you lot shape the pig'southward front legs later.
Side by side, draw a rough circumvolve overlapping at the dorsum of your pig's body. This should exist just under half the size of the trunk itself, and about half of it should overlap with the body (or a petty under half). This is going to help with the pig's rear legs as you continue drawing.
Step 3: Describe The Ground
Information technology may help to requite your pig something to stand on at this signal; this doesn't need to exist fancy, merely information technology will get in easier to get the legs in the correct places. Use the ruler to draw a line straight down through the grunter'due south body, completely vertical.
When you become to where the pig's anxiety should be, describe a cross to evidence yourself how the floor will look. One line should run parallel with the pig's torso, while the other will requite you depth. Have a quick look at some perspective tutorials if you demand a hand with this.
Step iv: Depict Rough Legs
Put in 4 lines to give yourself an indication of where the legs will be. All 4 should gently curve toward the front of the pig'south body.
Footstep 5: Start Adding Musculus
Pigs are mesomorphic animals, then y'all want to show their muscles. On the pig'southward shoulder, depict ii circles that approximately comprehend the oval you already put in place. The lower of these 2 circles should be slightly larger than the upper one. It's fine if they overlap a picayune.
Over your hip muscle, you're going to draw a 2d circumvolve, a fleck smaller than the hip and slightly squashed. It should sit a lilliputian lower downwardly than the hip; this is the large thigh muscle.
Step half dozen: Add The Head And Body
Sketch a big, rounded caput in front end of the grunter's legs, and depict forth to smooth the pig's body, filling in over the shoulders and between the body and hip. Sketch a petty curly tail in place at the dorsum.
Step 7: Work On The Legs
Draw a lilliputian circle in the centre of each front leg, and a slightly larger circumvolve in the middle of the dorsum legs. Sketch a semicircle at the bottom of each leg, and so fill in the line between this and the circles you've just drawn on the front legs; these are the pig'southward hooves.
On the dorsum legs, the hooves should come almost halfway upwards to the circles you just drew; y'all will then add smooth curves to finish the gap to the articulation.
Adjacent, add muscles above the articulation on each leg, and add toes to the back of the sus scrofa'south hooves. Requite the hooves shape by dividing them into two trotters.
Step 8: Work On The Head
Depict a line that continues the shape of your pig'south body to guide y'all on where its head should go. A little "perspective" cantankerous at the top should help you with positioning the features.
Sketch a rough snout shape, aiming for a flat head at the tiptop where the skull connects to the snout. Add a trivial triangle at the end of the snout to create the upturn of the squealer's nose. Draw a oral fissure and so a jaw underneath it, curving back to the pig'due south neck.
The centre sockets should be sketched as circles at the tiptop of the snout. These are quite big and oval. Add together smaller eyes within. Next, draw the ears as smoothed rectangles just to a higher place, and requite them triangles that flop down towards the grunter'southward eyes.
Footstep 9: Add together Detail
Your piggy is almost finished. Add some more detail on the head, accentuating the snout, giving him nostrils, and finishing off the bend of the tail. You lot can too add lines that suggest the sus scrofa's leg muscles and perhaps a chip of chubbiness effectually the cervix.
Shade the inner part of the back foreleg and back rear leg, and add a scrap of shadow forth the lower tummy, cervix, snout, ears, and face up. This should make your pig look and feel more 3D.
Erase whatever extra lines that represent the original guides nosotros drew, such every bit the shoulder muscles, etc.
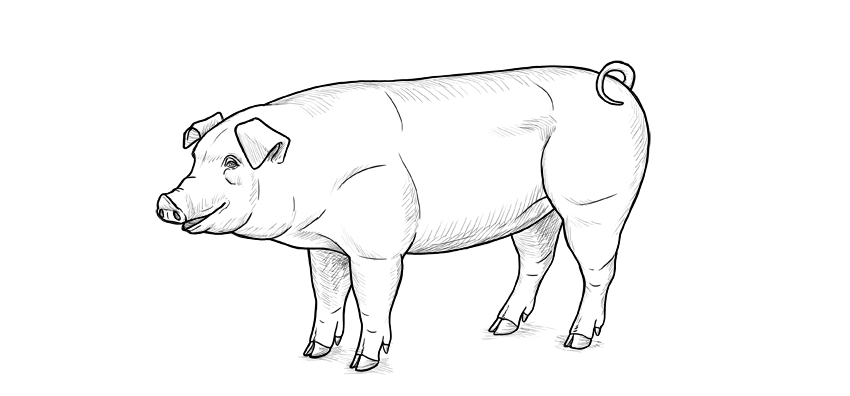
Footstep ten: Outline Your Grunter
In one case yous're happy with how your pig looks, you tin can outline it with a blackness fineliner if you desire to. This isn't essential, still, so if yous prefer your squealer in pencil, that's fine too.
Decision
Hopefully, you've got a pig to be proud of. Don't worry if yous feel you could do better; there'southward always next fourth dimension. Keep practicing and praising yourself for your efforts. Pigs are a majorly challenging thing to draw, and so don't be discouraged even if you lot aren't very happy with your drawing.
Try looking at some pictures of pigs online and take some other get!
whitfieldfortiont.blogspot.com
Source: https://craftwhack.com/how-to-draw-a-pig/
0 Response to "How to Draw a Pig - 10 Steps & Some Tips & Techniques"
Post a Comment